

RAF Armament Bits - Bombs
| Courtesy of the Fife Collection | |
The Mills BombsYup, early on, some intrepid RFC airmen did drop grenades on enemy infantry. The Mills bomb was developed early in 1915 (by William Mills, who got knighted for it) and here is a cutaway Drill Purpose Mills No 5 of WWI antiquity to reveal its anatomy. The body was cast out of iron and the base was threaded to take the detonator assembly. The detonator assembly was made out of light alloy and was threaded so as to screw into the Mills body. |
 |
 |
Mills Bomb Components The other component parts of the Mills Bomb are: Fly-off lever; lever securing pin; primer, fuze and detonator assembly; striker and spring; filling-hole screw; base plug. |
| Courtest of the Fife Collection | |
Mills Bomb AssembledHere are two views of the assembled Mills bomb. It can clearly be seen that removing the securing pin will allow the lever to fly off and the striker to fly down to hit the primer. The fuze came to be supplied in two durations; four seconds for hand-throwing and seven seconds for use with a rifle grenade discharger. Mills bombs were shipped to the troops separate from the fuzes; these being inserted shortly before use. The final incarnation of the Mills bomb, the Mills 36, ceased production in 1972, the last of these being manufactured by Qualcast. (Think of that the next time you mow your lawn) |
 |
| Courtesy of the Fife Collection | |
 |
US 'Pineapple' Grenade IgniterThe design of the Mills bomb meant that a lot of space inside the body was taken up with the striker / detonator pockets. For comparison, we show the small, external striker of the US 'Pineapple' grenade (lever removed) which shows how a small sprung pin could rotate onto a primer cap (note the deep indentation) and set the fuze burning. |
The way that bombs were fuzed, carried, selected, and dropped is as follows: |
|
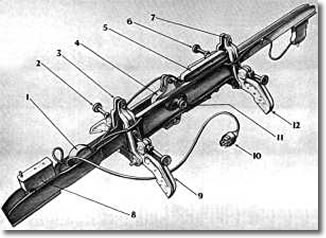
Universal Bomb CarrierBombs were loaded up into bomb carriers that were designed for specific purposes i.e. for use in a bomb bay, or for use under a wing. The carrier shown here is the Universal Bomb Carrier No. 1 Mark III, which could carry ordnance (bombs, depth charges, Small Bomb Containers, flares, photographic flashes, practice bombs) from 50 to 500 pounds weight. Bombs had a loop on the top of their casing which engaged with the jaws of the Release Slip (4) and the crutches (9 and 12) were adjusted to position the bomb firmly. The Fuzing Unit (8) contained a solenoid which would allow the bomb to be dropped in an armed state, or jettisoned safely. There was a similar unit at the rear of the carrier. More of these later. |
 |
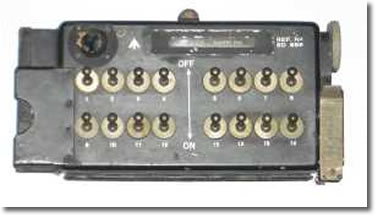
Bomb Selector Panel Ref. 5D 656The bomb selector panel was used to select the bombs that were to be dropped, and the release pattern. The rotary switch on the top right could be set to Safe; Single & Salvo; Distributor; and Container. If Distributor was selected the Distributor function would release the bombs in a pre-set order. The switches on the panel front selected the bombs, which were then armed by operating either or both of the two fusing switches positioned next to the unit; one for nose fuses, and one for the tail fuses. When the bomb was armed, the solenoid unit in the bomb carrier would close and grip a wire that was attached to the fuze on the nose of the bomb. When the bomb fell, the wire pulled a safety pin from the bomb fuze, allowing a small wind vane to rotate and activate the fuze after a certain number of turns. |
 |
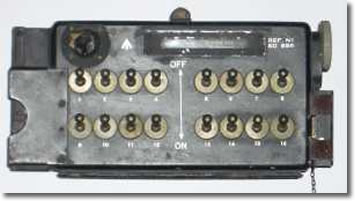 |
Bomb Selector Panel - Jettison Clip RemovedIf the bombs were to be jettisoned safely then the small metal clip on the right side of the panel would be pulled off, to reveal the ends of a pair of plastic strips, or jettison bars, (see picture). To jettison the bombs the bars would be pushed to the left. |
Bomb Selector Panel Jettison Bars MovedThis photograph shows the panel after the bombs have been jettisoned, and the left hand ends of the jettison bars can be seen to have been pushed out to the left of the panel. To reset the panel after a jettison procedure the jettison bars would be pushed back into the panel from the left and the safety clip refitted. |
 |
Target Identification
 |
Target Identification by H2SThe H2S radar system gave Bomber Command a means of identifying and bombing targets with greater reliability during the latter half of WWII. Essentially, H2S gave a radar picture of the terrain below, but many factors contributed to the quality of the image that was shown on the radar scope. The radar waves that H2S sent to the ground might hit water, smooth terrain, rough terrain, sides of buildings etc. and as the aircraft carrying the H2S set moved over the terrain, the reflected signals could change quite radically. Here is a sample H2S picture of the Wash in Norfolk. While the coastline shows up strongly, detail of the terrain and built-up areas just behind the coastline has been swamped by the strength of the return. |
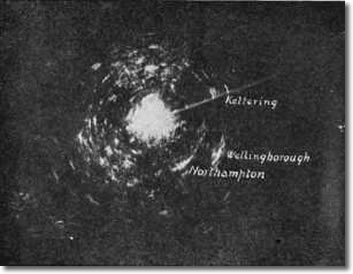
Interpretation of the H2S ImageThis H2S image shows a group of towns in England, and it is quite evident that if the H2S operator was not skilled at comparing the H2S images with the actual position and shape of the built-up areas on the map, the risk of bombing the wrong target would be high. H2S was a valuable tool in the bombing campaign; but like any tool it had to be used correctly. |
 |
Miscellaneous
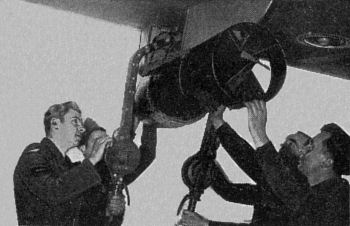 |
A 500 pounder is loaded on a MosquitoA 500 pound bomb is winched up to the jaws of a bomb rack mounted on the underside of the wing of a Mosquito. The aptly named "hockey sticks" were highly-geared portable winches that were widely used within the RAF. |
© Copyright 2007 CairdPublications.com | Site Map | Contact Us |